Instagram
Follow on Feedspot
Follow on Bloglovin
Nicoles Nails

Wednesday 26 March 2014

Zebra Print

Hi everyone, today I've got another first for me with the design of this mani. I've used BarryM polishes for this design, starting with their black polish for the base colour, and their white on the ring finger.

I've not tried a zebra print design before but I'm glad I did as it's a really effective design! Once the black and white base coats were dry, I used BarryM's black nail pen to draw small lines and triangles onto my white accent nail, to create a zebra print. This is sooo easy to do! 


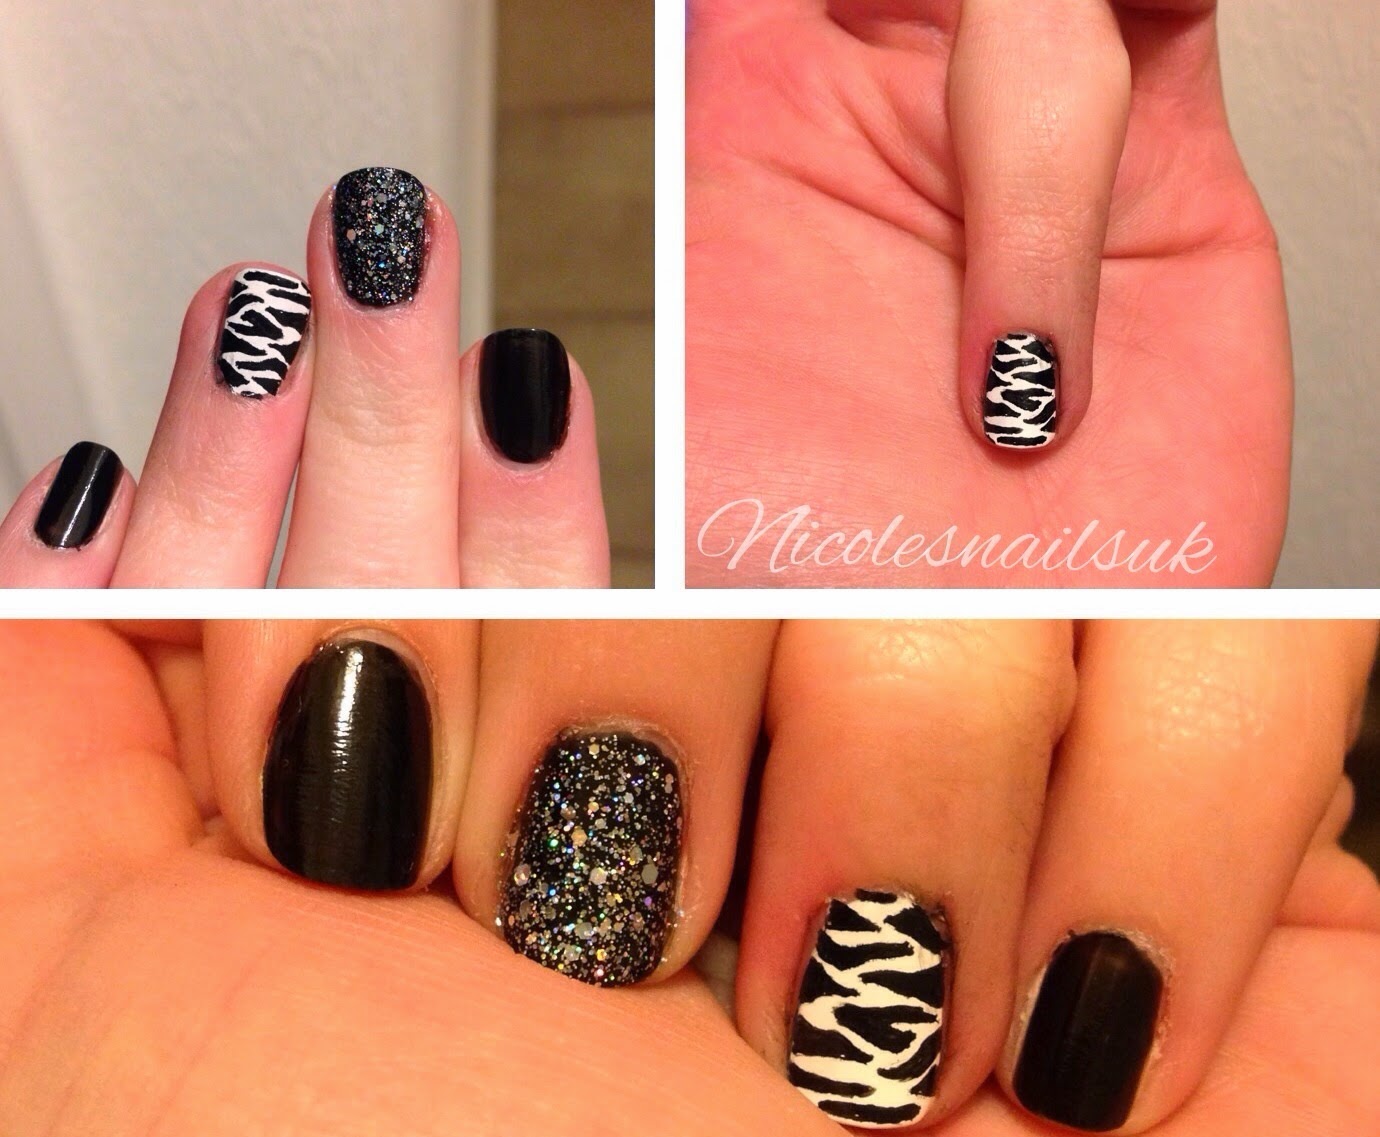
Next as usual I wanted some sparkle! So I've used BarryM's 'Diamond Glitter' on top of the black on my middle finger. This has got to be one of my favourite glitters, because when the light catches it, it's so pretty! 

And that was it! I've used BarryM top coat to seal in my design and then I was good to go. Just make sure you leave the zebra print as long as possible before adding the top coat. I tend to find even though the nail art pen appears dry, it will streak into the white when you put the top coat on! It's definitely worth giving this mani a try because it's one of the most effect and quick designs so far! 


Nicole x 
@nicolesnailsuk
Pinterest.com/nicolesnails
Instagram: #nicolesnailsuk @nicolesnailsuk

Friday 21 March 2014

Another Rose Mani

Hi everyone, welcome to today's post. Now today I've got a rose design for you. I know I've done lots of these style designs before, but I haven't posted much this week and wanted to show you what I'm wearing! 

I've used my favourite nude colour for this mani: Models Own Hyper Gel 'naked glow' and then a mixed collection of colours and brands for the roses! 


I usually go for shades of blue for the base colour on a rose mani, but I'm actually really liking the nude background, especially with the green ('key lime' by BarryM) as it really pops.


Another slightly different element to this mani is my accent ring finger, I've gone from a collection of smaller roses to just one large one so this nail stands out and I'm loving how that turned out! 


So I hope you like this mani as much as I do!  See my rose tutorial here to see how they are done!

Nicole x
@nicolesnailsuk
Pinterest.com/nicolesnails
Instagram: #nicolesnailsuk

Tuesday 18 March 2014

Navy polka dots

Hi everyone, welcome to today's post. Just have a quick one to show you today thanks to an incident with some nail glue...

So last night I was almost finished this lovely mani, using Models Own hyper gel and my BarryM black nail pen to do some lovely swirls. I then decided it was a great idea to add a small bow with some nail glue. While trying to get the lid off I discovered it had glue itself on and then the whole tube snapped in half! Resulting in my face, chest, clothes and hands being covering in glue! Not good! I was then even more annoyed when I realised there wasn't enough left in it to stick my bows on so it was all a waste of time! I also then ruined the mani using nail varnish remover on my fingers while trying to get the glue off! 


So after that disaster I decided to go for a more simple mani using BarryM's Navy polish and the while nail art pen. I put on two coats of the navy and let it dry, I then carefully used the nail pen to create white polka dots. 


This mani took quite a bit if patients and a steady hand but the effect is great so definitely worth it! I've have loads of compliments at work today, even from a couple of men! 


So I hope you like today's mani, and use my misfortune as a warning! Be careful with glue! Haha! 

Nicole x
@nicolesnailsuk
Pinterest.com/nicolesnails
Instagram: #nicolesnailsuk 

Saturday 15 March 2014

Cat and Fish Mani

Hi everyone! I hope your enjoying your weekends while I'm hard at work! Today I've got another cute animal themed mani for you to see! 

First of all, yesterday I broke a nail :( boo! And I can't stand having different lengths so I took the plunge and cut them all off! Now I've had some requests to do some manis for shorter nails, so from now on I can show you that the manis I do are still possible with short nails! This mani is a perfect example, it's still got lots of little details and works better for shorter lengths compared to longer nails. 

As I said in my last post I love owls! But I also love cats, so it was only a matter of time before I did a cat themed mani! 

I've used Barrym nail art pens for this design. First I created the little fish bowl on my thumb nail, just by drawing a rough circle and adding the lip on top. I then added a wavey line for the water and a tiny little goldfish and some bubbles. Once this was dry I then added a few white highlights to the bowl. 


Next I added the little cat to my ring finger. I've chosen to do just half of the cats head so it looks like it's peaking over at the fish bowl. The cat was really simple as it's just a black blob with two points for ears! I then used the white pen to add the details to its face. I also added a little black tail to my little finger. 


My other two nails looked a little bare once this was done so I added some paw prints. This is really similar to doing polkadots. Just a bigger circle first, and four small dots around one edge. 


And that's it! The shorter nails work perfectly as the cat looks as if it's peering into the bowl, which I don't think would have worked so well with my longer nails.

Happy Saturday everyone! 

Nicole x 
@nicolesnailsuk
Pinterest.com/nicolesnails
Instagram: #nicolesnailsuk 

Thursday 13 March 2014

Tutorial Time!

Hi everyone, today I've got a tutorial time for you to try! This is a really effective mani, and made me feel nice and summery! 


The base colour is BarryM's 'papaya' Gelly, which is a lovely bright orange/coral colour. I've done about four coats for this, so it's nice and thick. Once this is really dry you can then start on the zig zag pattern, I've just done an accent ring finger as it's quite fiddly! Use any sort of tape for the next part, I've used masking tape, but normal tape is fine too. 


Cut small triangles into each side of the tape (I used nail scissors as they are much easier to see what you are cutting), obviously the smaller the triangle the more zig zags you will get. Stick the tape to the nail, make sure it's all stuck down well, so no polish can get under the tape. Then paint over your whole nail with your chosen colour. I've used BarryM's Gold for this as it goes really well with the orangy colour for the base. While the paint is still wet slowly peel off the tape and you should be left with your zig zag pattern. 


Next I wanted to add some glitter to the mani. Now as much as I've got some lovely glitters in my collection, none of them were quite what I was looking for so I thought I'd make my own! You just need some clear top coat for this and some dry glitter. I've used an empty contact lens case to do this so I could just throw it away afterwards. 

Pour a small amount of top coat into your chosen pot then tip in as much glitter as you like (I used a lot!) then use a nail brush to apply the glitter, in the same way as normal polish. This created a lovely thick glitter with no gaps, which was exactly what I was looking for. 


And that's it your done! Just add some top coat to your mani and your good to go! 

Nicole x 
@nicolesnailsuk
Pinterest.com/nicolesnails
Instagram: #nicolesnailsuk 

Tuesday 11 March 2014

I Love Owls!

Hi everyone, welcome to today's post :) today your getting two for the price of one as I've got two owl themed designs to show you! 

BarryM are running a competition at the moment for animal themed designs and you can enter as many times as you like! So these are a couple of my entries so far.


Now anyone that knows me, knows I'm obsessed with owls! I love them and even have a tattoo of a owl on my foot, very similar to this first design. This literally took 5 minutes, and it was so easy to do. I started with BarryM's 'pearl' from their silk range and waited until it was completely dry. I then used my black nail art pen to draw the branches and to do the tiny owl design on my ring finger. Lastly I added some little pink blobs with my pink nail art pen to represent flowers :) 


The next design took a lot longer! Probably pushing three hours to do both hands! For this one I actually used a real pencil to draw a rough owl design on each nail for me to follow as it was difficult to do without any thing to go by. I used a small nail brush and BarryM's Navy for the body of the owl. Once this was dry I then added the eyes, beak and stomach with tiny nail brushes. 


I'm pleased with how both these designs turned out and I've had loads of compliments at work from customers liking the navy owls :) so I hope you like the designs and wish me luck for the competition! 

Nicole x 
@nicolesnailsuk
Pinterest.com/nicolesnails
Instagram: #nicolesnailsuk

Friday 7 March 2014

Lilac Sheen and Gems

Hey everyone, today I've got a pretty purple design to show you which is nice and simple for you to try at home.

I recently purchased a couple of Models Own hyper gels (see the post here) and fancied wearing one of those. I chose the lovely 'lilac sheen' for this mani, and I'm totally in love with the colour! 


I've used two coats, this is a nice thick polish so doesn't need anymore than that. I decided it needed a bit of sparkle so I've added some alternate dark and light purple gems on my accent ring finger. And added one to each of the other fingers as well. 


The gems are so easy to put on. Once your base colour is dry add a thin layer of top coat, then add a small amount of top coat to the pointed end of a cuticle stick (or cocktail stick/pencil) and carefully pick up the gem. Then just place the gem where you'd like it to be on your nail. Press the gem fairly firmly onto your nail so it sticks, but be very careful not to slide it around, otherwise it will probably mess up the base colour and top coat. 


Then once the original layer of top coat is dry add a couple more to seal the gems in place. And that's it! 

I hope you like today's mani. It's nice and simple and really pretty, perfect for the weekend! 

Nicole x 

@nicolesnailsuk
Pinterest.com/nicolesnails 
Instagram: #nicolesnailsuk 

Thursday 6 March 2014

Air Balloon Mani

Hi everyone, today I've got a slightly different mani to show you all. Yesterday I entered this mani into Lily Allen's competition that she has running at the mo along side her new single 'Air Balloon'. The brief was to create a mani for her inspired by her new single, so I went quite literal for this and created an air balloon mani. 


I used a mixture of barrym colours for this, and my trusty 'blue moon' for the base colour, which I fear is on it's way out now as it's gone a bit gloopy and the brush barely reaches what's left in the bottle! :( 


I created the balloon shapes, and baskets on my thumb nails using my black nail art pen, and then used a tiny nail brush to add a slightly different design onto each balloon. 


I then added lines to represent the ropes, which then link from the baskets on my thumbs to the balloons on my fingers. 

So I hope you like this mani, wish me luck for the competition! 

Nicole x 
@nicolesnailsuk
Pinterest.com/nicolesnails
Instagram: #nicolesnailsuk

Wednesday 5 March 2014

Rimmel Make Up Review

Hi everyone, welcome to today's post. I've got no nails for you today but I do have a little make up review for you to have a read of! 

I've been trying out some new make up recently, and trying to pull myself away from my old cheaper favourites, that I've always worn since I was a teenager! 


I recently tried a few new Rimmel products, which I'm going to review today. To start with I have Rimmel's 'Wake me up' foundation and I have to say I'm loving this. The foundation goings on lovely and evenly and gives you a lovely glow, and I also really like the smell haha! I've gone with soft beige, but to be honest I'll probably go a little lighter next time as I'm quite fair. I use a basic Make up pad to apply my foundation and dot it around my face before rubbing it in. And this goes on nice and smooth so I'm very happy. 


I've also recently been trying Rimmel's 'Match Perfection' compact powder, again I've gone with the soft beige but could of done with something a little lighter! I've always used a cheap brand compact powder, but now I've used this I don't think I'll be going back! The compact powder goes on lovely and evenly and doesn't leave a powdery look to your skin, around your nose and forehead, which I find is a common problem with the cheaper brands. The compact powder also comes with a hidden pad and mirror underneath the powder, so 
definitely great value for money and great to have in your handbag for touch ups! 


(Excuse Lilly the cat nosing in my make up bag!)

Lastly my new product is Rimmel's 'sable brown' Kohl eyeliner pencil. I've already converted to Rimmel eye liner after discovering how awesome it was when I won a Rimmel Goodie bag (see my post here) in January. I've never worn any eyeliner other than thick, bold black eyeliner so going for a more subtle brown was a big change for me. But I really loved it! As with the black kohl pencil it goes on really well and last all day, and the brown coupled with some brown eye shadow was a lovely, more subtle look for me, so I was really pleased :) 

So all in all, my three new products make me very happy, and I'm loving the change from my usual brands, and doubt very much I'll be reverting back to them. And it's shown me that sometimes you actually do get what you pay for! And it's definitely worth going for a branded make up product such as these Rimmel ones! 

Nicole x 
@nicolesnailsuk
Pinterest.com/nicolesnails
Instagram: #nicolesnailsuk 

Tuesday 4 March 2014

Feathered effect

Hi everyone, today I've got a nice simple mani to show you. I've created a graduated look for this mani using Nails Inc feather effect 'bath' and I've used Nails Inc 'Eton Avenue' for the base colour. 


I love this base colour because it's so unusual. The actual colour is slightly lighter than the pictures make it appear and I've used 3 coats for this as it's not the thickest of polishes. 


The feather effect polish I absolutely love! It makes a great change to normal glitter and it also dries better than most other glitters, so was really good for adding lots on to create the graduated look. 

To create the graduated effect, just add 3/4 layers on top of each other at the base of each nail, try to get lots of the glitter on the brush each time and avoid too much actual polish being on the nail. Then add 1/2 layers in the centre of the nail, and then leave the tip plain with just the base colour. 


So I hope you liked today's mani. See you soon for more designs! 

Nicole x 

@nicolesnailsuk
Pinterest.com/nicolesnails
Instagram: #nicolesnailsuk

Monday 3 March 2014

Tutorial Time!

Hi everyone, welcome to today's tutorial time. Today's mani is based on the Cath Kidston pattern strawberrys. This is a fairly simple mani, but you will need a small nail brush to be able to do the strawberrys. 


I've used BarryM products for this tutorial. The dark pink is 'pomegranate' and the lighter pink 'dragon'. I've also used 'key lime' for the green leaves and a normal white for the detailing. The base colour used is 'pearl' from their silk range. 


First of all make sure your base colour is nice and dry before you start. Use a small nail brush to paint on rough strawberry shapes, randomly on each nail.. I've done some individual strawberrys and some in pairs. For this bit I mixed white with the dragon to get a slightly lighter pink. Now add on the darker pink, choose an edge of each strawberry to highlight, to help create the strawberry shape. 


Now clean your brush and use the green to create the leaves on each strawberry. Go with the shapes and sizes that you feel will look best for each nail. Once this was dry I added a bit of white to the green so I could add some lighter highlights to each leaf to create a more realistic look. 

At this stage I then went back to the dark pink and just touched up each strawberry, making them neater and more defined.

Once everything is dry, take the smallest brush you have and create tiny lines on each strawberry to represent the pips. 


Then just add some top coat once it's all dry and you have your own strawberry design! 

I really enjoyed doing this tutorial, and I hope you do too! 

Nicole x
@nicolesnailsuk
Pinterest.com/nicolesnails
Instagram: #nicolesnailsuk